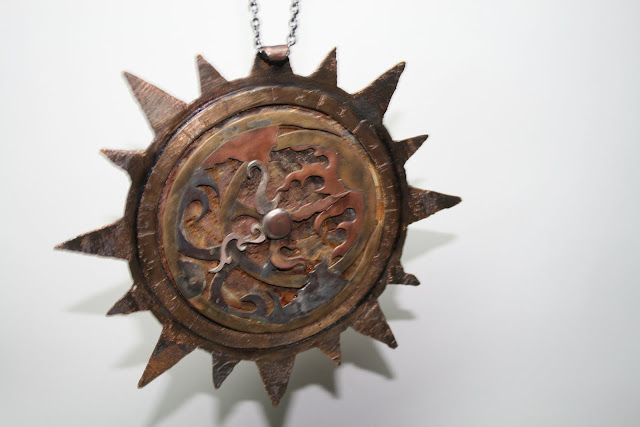
It has been some time. The latest project I have been working on is a wearable pendant based off of the old time-telling (it had other uses as well, hundreds by some estimates, including surveying) instrument known as the astrolabe. For those fo you who do not know what an astrolabe is, here is an excellent explanation of the device by TED talks guest Tom Wujec.
http://www.youtube.com/watch?v=yioZhHe1i5M
For those of you who do not have the time to watch the video, the simple explanation of the astrolabe is that it is a miniature map of the galaxy (that we can see from our vantage point in it). The ath of the stars around us are mapped on a brass plate, and the path of the sun and brightest stars are mapped on their own piece called a rete that goes on top. The rete is mostly empty space, allowing one to see the pattern of the star paths mapped on the brass plate below. The rest of the astrolabe is a back-plate that pulls it all together and is equipped with scales of all sorts, such as hours in a day.
Since it is hard to explain using words alone, here are several pictures to clarify, as well as provide the source of my inspiration. As is probably obvious, I own absolutely 0% of these images:
An astrolabe showing its various parts. The cutout portion is the rete, the circular pieces are the maps. Since each star map only works for a specific location, these maps had to be interchangeable. The other pieces functioned no matter where in the world you were.
A closer look at the rete and the ap beneath it. Since the really good astrolabes were made of brass (most others were wood or paper), I decided to try my hand at making one out of brass as well. It was the first time I really worked with brass, and it was enjoyable, though frustrating in one specific area: brass looks like copper after it is heated, so it must be sanded to remove this colouration. Otherwise, I liked brass a lot - probably more than copper, to be honest.
My piece also had silver and copper pieces in it, but the main bulk was brass.
Instructions on how to make an astrolabe. Plans from a Jewish dissertation on the subject. According to St. John's College website library (from whence these came):
"Masha' allah (c. 730 to 815), also known as Messahalla, was a Jewish astrologer from the city of Basra. He wrote the work On the Construction and Use of the Astrolabe in Arabic in the late eighth century."
Top left: backplate, also known as the mater.
Top right: instructions on how to make the maps.
Bottom center: detail of the rete.
My piece is not actually a working astrolabe; it is merely based off of one's design. More on this later.
The zodiac - whether Greek, Babylonian, Celtic, or even as far afield as Chinese - are often depicted in a circle like the one above. Astrolabes typically mentioned the zodiac as well as the months.
The Concept and the Piece
The goal behind this project was to make a pendant that was based upon a story that was personal to the maker. My own was based upon a story that I have been working on for at least ten years now; as such this story has become very personal to me. Rather than go into lengthy detail about the story, I will briefly explain the piece and how it relates to said story.
One of the things that has always fascinated me was the notion of lost empires and forgotten secrets. This is a foundational part of my story; as such, the pendant I created represents one such empire and the secrets buried with it. An astrolabe is an ancient device that is all about unveiling the mysteries of the heavens; so too is my piece made to unveil the mysteries of the lost empire that created it. I made this piece with the idea in mind that it had been made long ago by someone in that very empire. As such, the piece was made to look very old and battered.
In structure it is very similar to an astrolabe. It has a rete, a map, a backplate, and scales on both front and back that correspond to the culture that made it. This instrument, however, does not divine based upon the stars, but rather the four Greek elements - earth, fire, water, air. The concept of the four elements and the balance between them is another of those things that inspire my story, and so it was not only fitting, but important, to put it in the piece itself - not to mention the empire in question revolved its life around the elements.
Because there are four elements, the number four is crucial to the piece. The culture that made it looked to the four elements, the four seasons, the four cardinal directions, and four in general as a number of balance. As such, it does not have 24 hours in a days, but 4x4 hours in a day, which is 16 of course. This means each hour is ninety minutes rather than sixty.
This empire is supposed to be ancient, but even still it is younger than the even more ancient cultures that began the notion of sixty as a basic number of important. As such, the empire's numerical system is meant to be a hybrid of traiditional base-60 numerical systems and a younger (and extinct) base-16 number system. The importance of the numbers 4 and 16 are evident in the scales that represent the 16 hours, as well as the 16 pokes of the pendant's flange, the 4 elements depicted on the rete and radial, and so on.
Further, this piece is a map. Not just a map of the stars, but a map of a particular location and a structure. The design of the flange and the etch on the back correlate to a real structure (within the world), and the star map corresponds to said structure's geographical location.
The pendant is heavy, and it is suspended by a small chain. The main reason for this is the idea that its real chain would long ago have been lost, and so someone picking it up would have just used whatever chain came to hand.
And so, without further wait, here are the pictures of the piece:
When I showed this piece in its as-yet unfinished form (the etching and patinas still needed to be done), the major critique was that it looked unfished due to the scratches not looking intentional. I wanted to accentuate the age of the piece, and it is my hope that with the etching, patinas, and the other technques I imposed upon it (specifically finishing the back-plate and the star map), that it now does look like something very old, half-eaten by time. In part this effect was done through controlled manipulation of the mordant I was using, and the various patinas I applied. The other part was an attempt at a more natural look by allowing for some randomization in the etching process.
My hope is that this has proven effective.


